Today I needed a good dessert to take to share with my play-reading group, which has two gluten-intolerant members. In addition, my definition of gluten-free rules out wheat, rye, barley, soy and oats. We’ll have our quibbles about this view in another blog entry. I did finally find an apple crisp recipe on the web. This one comes from Scott Adams’ celiac.com website, identified simply as Apple Crisp #2 (Gluten Free). His recipe was for a 9″ x 9″ pan, I modified it for a 9″ x 13″ pan. Other than that modification, this recipe worked well just as written, but I have several food preparation points that I want to make in this blog.
10 large granny smith apples
1 ½ cup gluten-free flour
3/4 cup brown sugar
3/8 cup white sugar
1 ½ teaspoon cinnamon
1/2 cup chopped pecans
3/4 teaspoon nutmeg (I use whole nutmeg and grind it)
1 ½ stick butter, melted
Mix together dry ingredients and add melted butter; mix well.
Peel and slice apples and put in a 9 x 13 buttered pan. Spread flour mixture evenly over apples and bake at 350 for 45 minutes. Increase heat to 375 and bake about 10 more minutes.

By far the most difficult task of making this dessert is peeling, coring and slicing the 10 Granny Smith apples. It is a major undertaking. Here is the technique I have developed for this task. First I peel all 10 apples, using a sharpened standard paring knife (not serrated), leaving the peel on the dimple above and below the core. If you focus your attention, a rhythm begins to develop, and you can do an apple a minute or less.

Next, using a large chef’s knife (not serrated), I take each apple and cut it into quarters. Next, I take each quarter and cut out just the core and cut off the 2 little tabs of peel. It sounds time consuming, but there are two reasons why I do it. First, it doesn’t waste nearly as much of the apple as using a apple corer. Second, after a short time, you get into a pattern of cutting one tab of peel, the center core, and the other tab of peel in an “M” shaped stroke. The work goes quickly. I pitch each cored quarter into a large bowl.

And finally, I cut each quarter into thin slices of equal width. Using the large chef’s knife in my right hand (I’m of course right handed), and using my left hand to secure the apple quarter, I quickly and deftly slice it in 5 or 6 quick chops. I toss these slices periodically into the buttered 9 x 13 baking dish.
Permité moi a tiny rant about serrated knives. I HATE them. You cannot cut a straight slice with a serrated knife, and usually you cut yourself, because these implements of food and hand destruction are short, dangerous, and the WRONG tool for my kitchen. One of my great fears in cooking in someone else’s kitchen (e.g. family, etc.) is that I will encounter ONLY serrated knives. I have been known to bring my own knives on vacation. (Hint, hint.) Early in my career as a homeowner, actually, 35 years ago, I bought a good set of UNserrated knives, and I have used them ever since. They do have to be sharpened, however, almost every time. It takes 10 seconds to do so. Oh, and I’m adding this to my rant. Chop the pecans in this recipe with the 10″ chef’s knife. It will take you forever with a paring knife, and if you use a food processor or a nut grinder, you will end up with nut dust, which does not add the proper texture to your crisp. You’ve seen it on all the food channels a hundred times, just use a rocking motion on those nuts with your chef’s knife, and you will end up with chopped nuts of any size you want, depending on how long you chop. It’s quick, effective, and you don’t have to clean the blender. Just wipe off the knife.
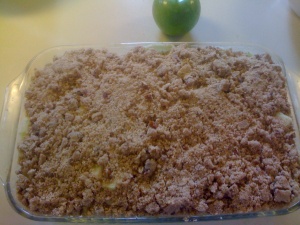
Now the apples are chopped, but you can see from the first picture above that I actually made the streusel mix for the crisp part before I engaged in apple prep. Scott’s recipe calls for gluten-free flour. There are MANY such preparations; some are good for one purpose, some for another. I have taken to mixing my own gluten-free flour from a recipe given to me by my friend, Marsha. It gives good results in many situations and you can make as much or as little as you need. However, you do have to buy three different kinds of alternative flours. Use this combination: 6 parts rice flour, 1 part potato flour, and 1/2 part tapioca flour. Mix thorougly.

Most everyone has made crisp topping, and making this crisp topping goes along pretty much in a standard way. Mix all the dry ingredients well, either stirring a while, or using a wire whisk blender. Melt the butter, and blend. I actually break up the lumps in the brown sugar with my fingers and then mix the dry ingredients and the butter first with a spoon or fork and finally with my fingers. Spread the streusel evenly over the apple slices. The dish will be quite full.

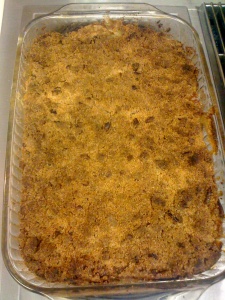
I would say that timing is fairly crucial for this recipe. This particular mix of gluten-free flour burns easily, so timing and oven settings are critical. Better to err on slightly under 350 rather than over 350. But 45 minutes seems about right. Then turning up the oven for 10 minutes at 375 browns and bubbles the dish nicely. Remove immediately and turn off the oven, but the apples continue to cook after the dish is removed, and the crisp only fills up the dish to half level when cool. Serve and enjoy.
Questions about the flour mix: is that brown rice flour or white rice flour? is that potato starch or potato flour? is it tapioca starch or tapioca flour?
I used brown rice flour for nutritional purposes, potato starch and tapioca flour. I have read cautions about using potato starch rather than flour in baking. I think that the white rice flour, if you have it could be used, and would make a slightly lighter product.
Extremely interesting blog post thank you for sharing I just added your site to my bookmarks and will be back 🙂 By the way this is a little off subject but I really like your web page layout.